University of Nebraska Omaha logo University of Nebraska Omaha
APPLY MY UNO DIRECTORY

Students Faculty Staff Community
University of Nebraska Omaha logo
College of Education, Health, and Human Sciences Biomechanics
APPLY MY UNO DIRECTORY
Students Faculty Staff Community
  • About Us Backback to Main menu
    • About Biomechanics
    • Letter from the Founding Chair
    • Faculty & Staff
    • Collaborators
    • Annual Report
    • Directions and Parking
  • Academic Programs Backback to Main menu
    • Awards and Scholarships
    • Undergraduate Programs
    • Graduate Programs
    • Courses Offered
    • Alumni Career Placement
  • Facilities
  • Research Backback to Main menu
    • Research Areas
    • Center for Research in Human Movement Variability
    • Center for Cardiovascular Research in Biomechanics
    • Digital Commons
    • Cyborg Beast
  • Community Engagement Backback to Main menu
    • Community Outreach
    • Seminar Series
    • Human Movement Variability Conference
    • Services for the Community
    • Free Upper Extremity Clinic
    • Annual Nonlinear Analysis Workshop
  • Involvement Opportunities Backback to Main menu
    • Involvement Opportunities
    • Post-Doctoral Fellowships
    • Graduate Assistantships
    • Undergraduate Research and Internship Opportunities
    • Biomechanics United
    • Testimonials
  • Service Centers Backback to Main menu
    • Machining and Prototyping Core
    • Sports Medicine and Biomechanics Research Lab
    • Movement Analysis Core
    • Quantitative Analysis Core
    • Tissue Analysis Core

Assembling the Cyborg Beast

  1. UNO
  2. College of Education, Health, and Human Sciences
  3. Biomechanics
  4. Research
  5. Cyborg Beast
  6. Assembling the Cyborg Beast

  • Additional Resources

  • About the Team
  • Devices
  • Our Research
  • Tutorials
  • Sponsors and Resources

Before beginning assembly of the Cyborg Beast, first identify all the pieces from the 3D printing.

cyborg beast tutorial

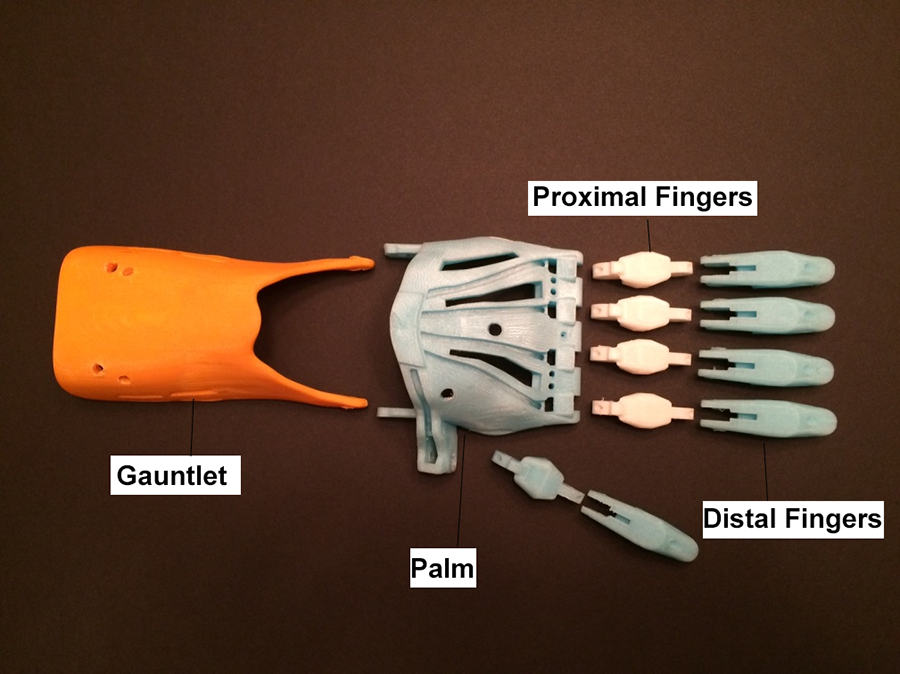
The proximal finger sections are closer to the palm with the distal section being the finger tips. Notice that the 2 pieces for the thumb are slightly different in that the distal finger is smaller than the rest and the proximal finger is wider.

cyborg beast tutorial


Drilling

All sections that are to be secured with a Chicago screw must be drilled with a 7/32” bit. If you are assembling a small hand, you may need to start with a smaller bit and work up to a 7/32” bit in order to avoid splintering the plastic.

cyborg beast tutorial

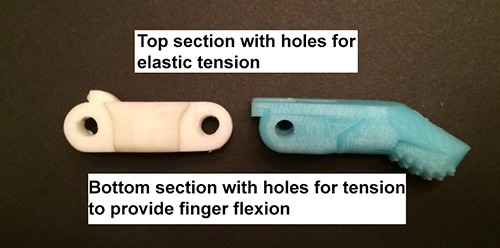
All smaller holes that support both the elastic cord and the tension cord must be drilled to clean out excess debris. The finger sections must be drilled on both the top (for the elastic cord) and the bottom (for the tension cord). A 1/16th drill bit is sufficient for the opening on the bottom section. However, depending on the size of the hand to be assembled, a slightly larger drill bit may be used for the top holes.

cyborg beast tutorial

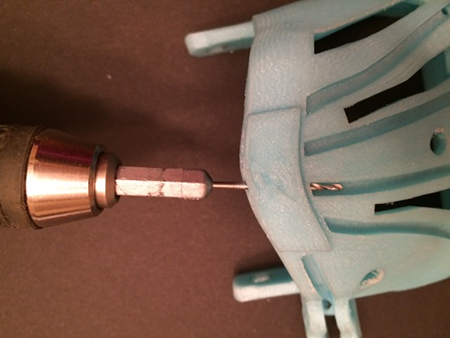
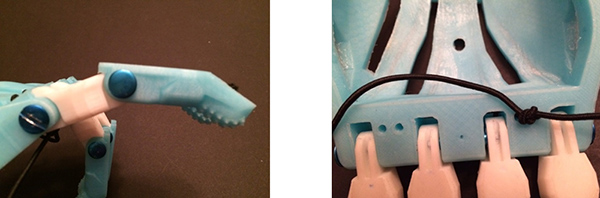
Remember to drill the holes on the palm section where the tension cord will be threaded to reach the gauntlet.

cyborg beast tutorial


Filing

Using a small file, smooth all rough edges of the plastic pieces. A nail file or emery board may be used in place of a small file. Depending on the quality of the printing and the size of the hand, there may be minimal filing or more involved filing to be done.

cyborg beast tutorial

Once all the rough edges are smooth, assemble the proximal and distal finger sections with a Chicago screw. The finger should move freely through the full range without limitations. If the range is limited or there is friction with movement, remove the screw and file the rounded end of the proximal finger piece until there is full and free movement at the joint. Additional filing of the sides may also be necessary.


Elastic Cords

Choose elastic cord that is best suited for the size of the Cyborg Beast hand that is being assembled. For a larger hand, 2mm elastic cord is appropriate. For a smaller hand 1.5 mm elastic cord will be sufficient.

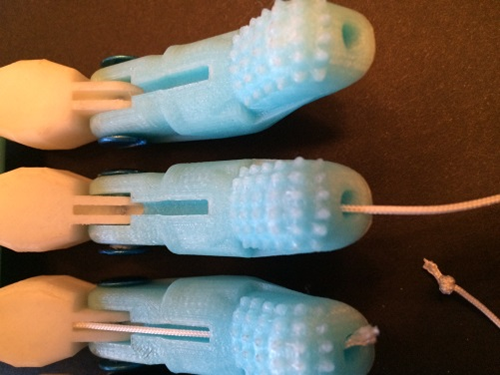
Cut 5 pieces of elastic cord approximately 7 inches long. At one end of the cord secure a knot. If using thinner cord, 2 knots may be required to keep the elastic from slipping back through the finger.

cyborg beast tutorial

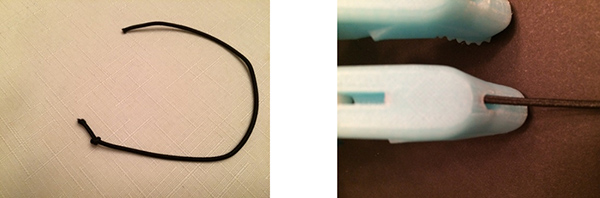
Begin by threading the cord through the top of the distal finger piece. Proceed to thread the elastic cord through the proximal finger piece as shown. The end of the cord is then threaded down through the palm section.

Tip: If it is difficult to push the cord through the holes, a thin piece of wire or nylon thread can be used to assist with pulling the cord through. Fold a thin wire or nylon thread in half and push it through the hole. Loop the wire around the cord end and pull back through the hole. A pair of tweezers or needle nose pliers can be helpful in manipulating the cords.

cyborg beast tutorial

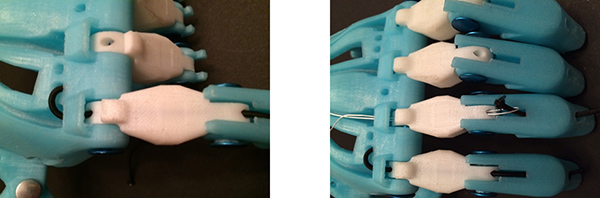
The thumb elastic cord is pulled through and secured as pictured below. Before tying the knot, pull on the cord to make sure the knot will is secure and will not pull through the end of the finger. Then adjust the tension in the cord so that it is adequate to just maintain the finger in the straightened position. Too much tension will require extra force by the prosthesis user to achieve finger flexion.

cyborg beast tutorial

With the fingers, adjust the tension in much the same manner, assuring that tension is adequate but not too much. Secure the 2 cords on the palmer surface with a square knot. If tension adjustments are required later, the knots can be untied and adjusted as necessary.

cyborg beast tutorial


Tension Cords

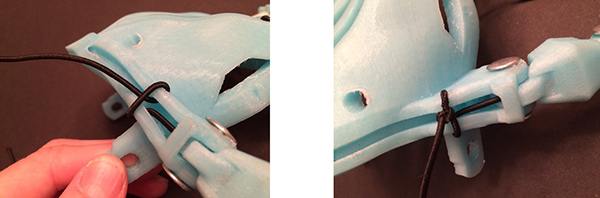
Using 1.5 mm nylon cord cut 5 sections that are 14 inches in length. Secure a double knot at one end of the cord. Beginning at the distal finger section on the bottom side, thread the cord from the distal to the proximal section.

cyborg beast tutorial

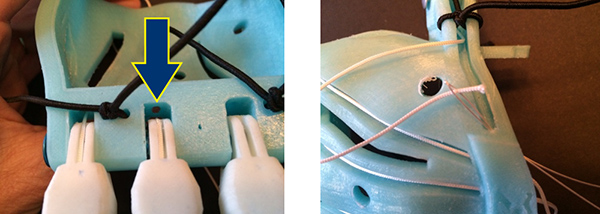
The cord must be fed through the small hole in the palm section (as pictured) to the top of the palm. To assist with threading the cord through the small hole, a thin wire can again be used to help pull the cord through.
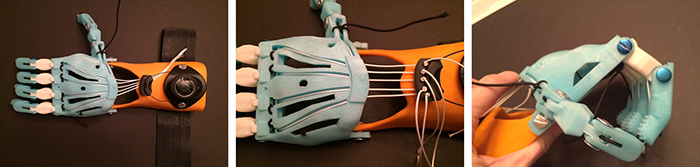
cyborg beast tutorial


Gauntlet

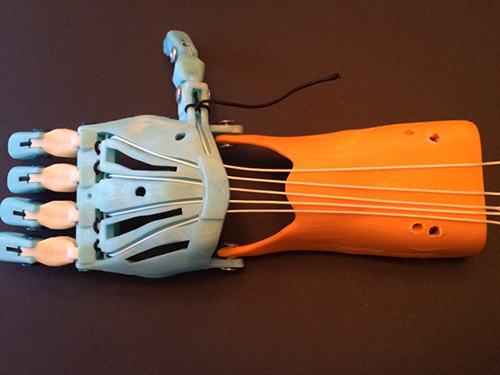
Secure the palm and gauntlet sections using 2 Chicago screws. If necessary, enlarge the holes by drilling with the appropriate bit. Again, if the holes are quite small, start with a smaller bit and incrementally enlarge the hole using larger bits. This will help to prevent cracking or slivering of the plastic.

cyborg beast tutorial


Tensioner

For the BOA tension system, small holes need to be drilled in the plastic bar for the tension cords to be secured.

cyborg beast tutorial

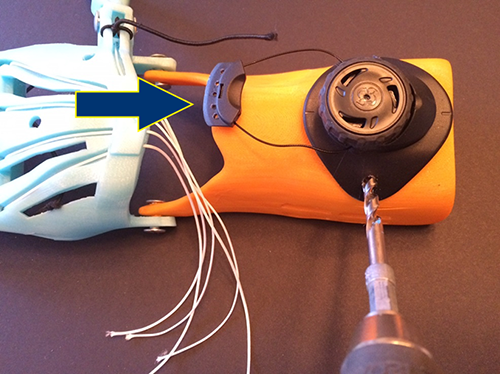
With the tensioner centered on the gauntlet and near the edge, drill holes on both sides through the tensioner and the gauntlet. Holes can be cut into the strapping material to correlate to the holes just drilled. With Chicago screws, secure the strap to the gauntlet on the bottom side, while securing the tensioner on the top.

cyborg beast tutorial

After threading cords through the tension bar, secure with knots, making sure the tension is consistent in all cords. If tension is consistent, all fingers should pull down together. Adjust tension on knots as necessary. Once the tension is accurate in both the elastic cords and tension cords, all cord ends can be trimmed. A drop of super glue is recommended on all knots to make sure they stay secured. An additional strap can be secured in the palm section with 2 Chicago screws.

Assembly is now complete! Feel free to contact us if you have any questions.

Announcements

  • Biomechanics Annual Report
  • UNO Biomechanics Degrees One-Sheet

Contact Us

  • 6160 University Drive South
  • Omaha, NE 68182
  • Phone: 402.554.3228
  • Email: unobiomechanics@unomaha.edu

Additional Resources

  • About the Team
  • Devices
  • Our Research
  • Tutorials
  • Sponsors and Resources

Biomechanics

Contact Us
  • Department of Biomechanics
  • College of Education, Health, and Human Sciences
  • Biomechanics Research Building
  • 6160 University Drive South
  • Omaha, NE 68182   map
  • 402.554.3228
  • unobiomechanics@unomaha.edu
Resources
  • About Biomechanics
  • Facilities
  • Research
  • Support Us
Photo of the front of the Biomechanics Research Building on UNO's Campus

Next Steps

  • Visit UNO
  • Request Information
  • Apply for Admission
  • The UNO Advantage
  • Our City (Omaha)

Just For You

  • Future Students
  • Current Students
  • Work at UNO
  • Faculty and Staff
  • A-Z List

Popular Services and Resources

  • my.unomaha.edu
  • Academic Calendar
  • Campus Buildings & Maps
  • Library
  • Pay Your Bill
  • Course Catalogs
  • Internships & Career Development
  • The Maverick Store
  • MavCARD Services
  • Military-Connected Resource Center
  • Speech Center
  • Writing Center
  • Human Resources
  • Center for Faculty Excellence

Affiliates

  • University of Nebraska System
  • NU Foundation
  • Buffett Early Childhood Institute
  • Daugherty Water for Food Institute
  • National Strategic Research Institute
  • Peter Kiewit Institute
  • Rural Prosperity Nebraska
  1. University Policies
  2. Privacy Statement
  3. Accessibility
  1. 402.554.2800

University of Nebraska Omaha
University of Nebraska Omaha, 6001 Dodge Street, Omaha, NE, 68182
  • ©  
  • Emergency Information Alert
  • MavsReport

Social Media


Omaha Skyline

Our Campus. Otherwise Known as Omaha.

The University of Nebraska does not discriminate based on race, color, ethnicity, national origin, sex, pregnancy, sexual orientation, gender identity, religion, disability, age, genetic information, veteran status, marital status, and/or political affiliation in its education programs or activities, including admissions and employment. The University prohibits any form of retaliation taken against anyone for reporting discrimination, harassment, or retaliation for otherwise engaging in protected activity. Read the full statement.